Configuring VPN-server on Ubuntu
Nowadays VPN services are particularly popular among “advanced” users in those countries, where freedom of expression and free access to information is restricted (China, Belarus, Russia and others). Leaving the politics aside, we note that the free access to information has made the Internet a popular and useful phenomenon.
Let’s try to make own VPN-server based on the simplest SSD VDS. Among the many technologies, we will use L2TP/IPSec. This type of VPN-tunnels is supported by not only the desktop operating systems, but the devices based on Apple IOS (iPhone, iPad) and Android.
First step is to order SSD VDS and choose Ubuntu as the operating system. There are no special resource requirements, so you can choose the simplest fare, with 512Mb of memory. Installing the operating system takes about 5-7 minutes, and after the installation you will receive an email with the access to VDS. Now choose any SSH-client (e.g. PuTTY) and proceed to setup.
Install the required applications:
apt-get install openswan xl2tpd ppp
During the installation process you will be asked about the key generation. Abandon the automatic key generation (select “No” in the dialog).
Using your favorite text editor (vi or nano), edit the file /etc/ipsec.conf:
version 2.0

config setup
    nat_traversal=yes
    oe=off
    protostack=netkey

conn L2TP-PSK
    authby=secret
    pfs=no
    rekey=no
    type=tunnel
    esp=aes128-sha1
    ike=aes128-sha-modp1024
    ikelifetime=8h
    keylife=1h
    left=185.14.XX.XX
    leftnexthop=%defaultroute
    leftprotoport=17/1701
    right=%any
    rightprotoport=17/%any
    rightsubnetwithin=0.0.0.0/0
    auto=add
    dpddelay=30
    dpdtimeout=120
    dpdaction=clear
It is necessary to specify the IP-address of the VDS in the parameter left=.
The next step is to add the encryption key. To do this, specify the desired key in the file /etc/ipsec.secrets (change its value to some more secret):
%any %any: PSK "TestSecret"
Now we proceed to configuring L2TP. Open the file /etc/xl2tpd/xl2tpd.conf in the editor and change its contents to the following:
[global]
ipsec saref = yes
[lns default]
ip range = 192.168.1.231-192.168.1.239
local ip = 192.168.1.230
refuse chap = yes
refuse pap = yes
require authentication = yes
ppp debug = no
pppoptfile = /etc/ppp/options.xl2tpd
length bit = yes
Now setting up PPP. Our next target – the configuration file /etc/ppp/options.xl2tpd:
require-mschap-v2
ms-dns 8.8.8.8
asyncmap 0
auth
crtscts
lock
hide-password
modem
debug
name l2tpd
proxyarp
lcp-echo-interval 30
lcp-echo-failure 4
Our connection uses password authentication, so we need to mention it in the appropriate file – /etc/ppp/chap-secrets:
* * TestPassword *
We are done with VPN configuration, but we need to enable NAT (network address translation) in the network settings of the operating system. Open the file /etc/rc.local and specify the following command in the very beginning:
echo 1 > /proc/sys/net/ipv4/ip_forward
iptables -t nat -A POSTROUTING -s 192.168.1.0/24 -o eth0 -j MASQUERADE
The configuration of our VPN-server is over. Reload VDS by reboot command and after a minute you can start using our encrypted channel for Internet access. In the meantime, let’s configure our iPhone. Go to “Settings” – “VPN”, then select “Add VPN Configuration …”. Fill in the fields:
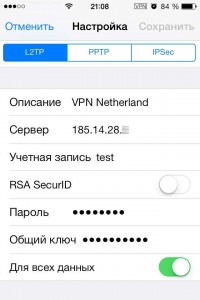
- Type of VPN – L2TP
- Description – select any convenient name, such as My VPN or ITLDC VPN
- Server – specify the IP-address of our VDS
- Account – any name
- RSA SecurID – off mode
- Password – your selected password (in our example – TestPassword)
- Secret – the encryption key (TestSecret)
The configuration of the client part is finished, select “Save”. To connect to a VPN, you should turn VPN on in the “Preferences”. Connecting to a VPN is quite fast: after a few seconds, you can enjoy all the benefits of the Internet, without any restrictions.